Shop Floor Barcode System
In 2005 I developed a simple barcode system that allowed you to put barcodes on printouts for displaying the documents in Microsoft Dynamics NAV. Initially the system was called ‘Document Lookup’ because it was exactly what it did; you scanned the barcode and Dynamics NAV displayed the form in the client. This barcode system turned out to be a big success and it was extended to perform different functions as well (such as creating picks, finishing production orders, etc.). Since then I have used it in most places where I implemented Dynamics NAV and it now goes under the name ‘Shop Floor Barcode System’. Here is how it works:
The concept is quite simple; each barcode has two components separated by a special character (in this case a ‘$’): the first component is a number that identifies what NAV should do when the barcode is scanned, and the second component is the primary key field(s) also separated with a special charter (if more than one field).
For example: when scanning barcode ‘10$PA-00001’ Dynamics NAV knows that ‘10’ means that a Warehouse Put-Away should be displayed and ‘PA-00001’ is the Put-Away to display (and Dynamics NAV then simply runs that page).
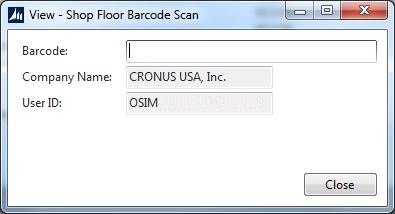
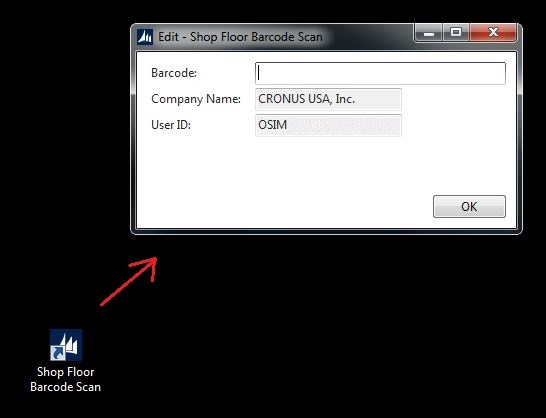
All barcodes are being scanned into the same field on a separate ‘Shop Floor Barcode Scan’ page that looks like below.
In many cases this is the only page that is needed on the terminals on the shop floor (or warehouse), the users then scans the barcodes to perform their activities. It becomes very efficient this way.
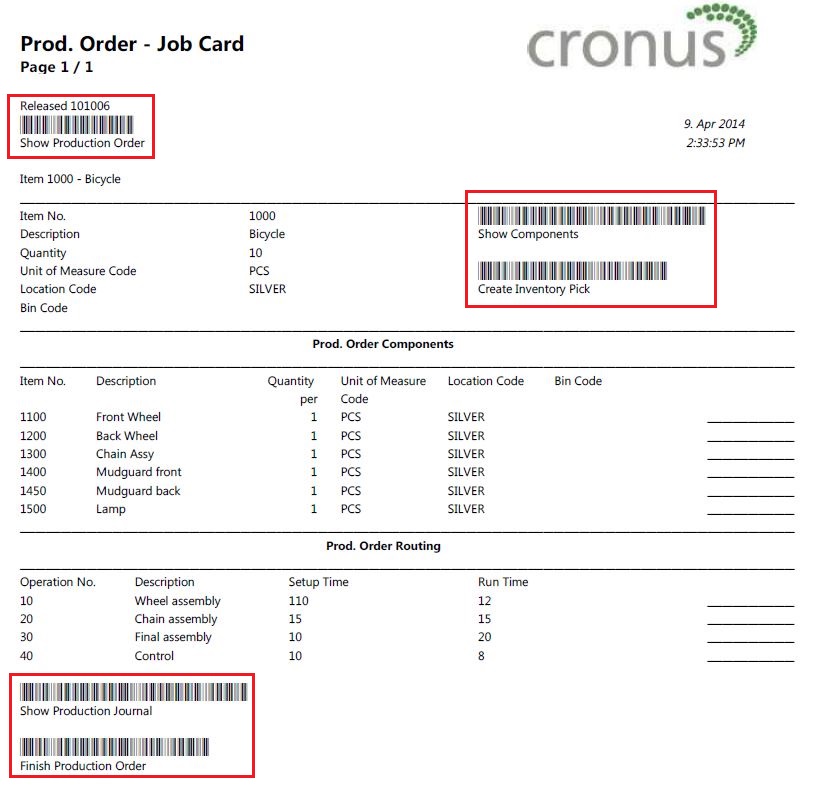
A Job Card printout can for example look like below, with different barcodes to Show Production Order, Show Components, Create Inventory Pick, Show Production Journal and Finish Production Order.
With the above, creating a pick for the production order is as easy as scanning the barcode and wait for it to print (Dynamics NAV will create and print the pick in the same process). Finishing a production order is as easy as scanning the barcode and wait for the confirmation. No more searching for the right document in Dynamics NAV and no more processing the wrong order by mistake. 🙂
The objects involved are one Page (‘Shop Floor Barcode Scan’) and one Codeunit (‘Shop Floor Barcodes Mng’). The page is where the barcodes are scanned and the Codeunit has functions to construct and read the barcodes. The barcodes then runs standard Dynamics NAV functions the same way you can run them in a client (very simple, nothing magic).
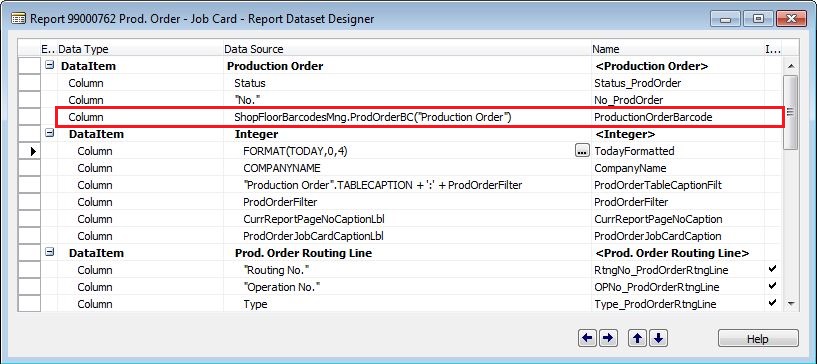
Adding a barcode to a printout is as easy as adding the call to the relevant function in the Codeunit to the Report Dataset.
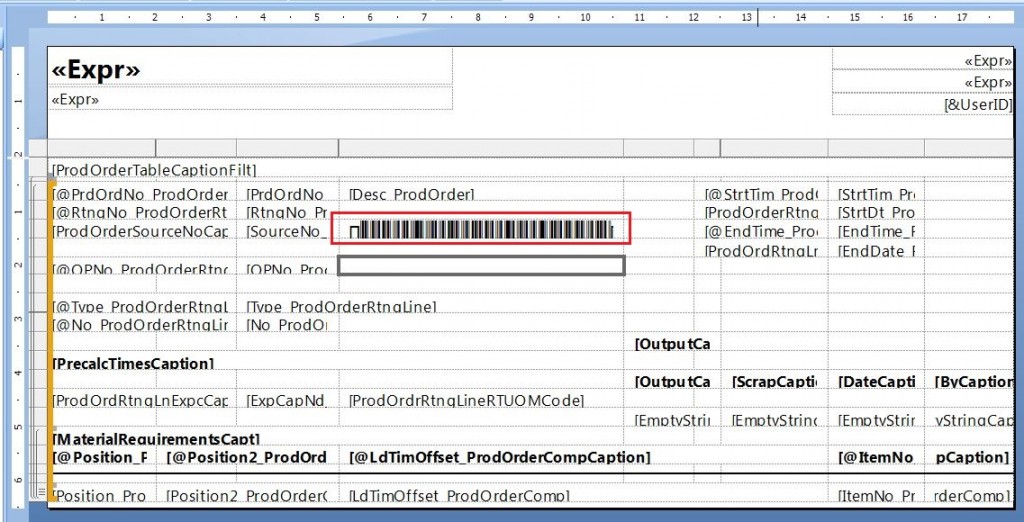
Then placing it on the Layout and selecting a barcode font.
In the Codeunit (that is available in the download section) there are predefined functions for the following:
– Display Warehouse Put-Away
– Display Warehouse Movement
– Display Warehouse Pick
– Display Inventory Put-Away
– Display Inventory Pick
– Display Warehouse Receipt
– Display Warehouse Shipment
– Display Transfer Order
– Display Simulated Production Order
– Display Planned Production Order
– Display Firm Planned Production Order
– Display Released Production Order
– Display Finished Production Order
– Create Put-Away for Purchase Order
– Create Pick for Warehouse Shipment
– Create Pick for Production Order
– Create Pick for Sales Order
– Display Production Journal
– Finish Production Order
– Display Production Order Components
– Create Pick for Transfer Order
Once you have the basic running, extending the functionality is easy. You can for example create barcodes for displaying the item tracking page if using lot or serial numbers, generate reclassification journals for moving materials to production, showing the bin contents for an item, displaying custom screens, etc… Basically anything you can do in the client you can also make it run with a barcode.
I use a Code 39 barcode; I think this is the simplest way of printing barcodes. The Codeunit has a function called ‘MakeBarcode’ that just appends an ‘*’ in the beginning and end of what is being barcoded, this way you can just change the font to a Code 39 font and it should work.
I have also used Code 128 barcodes before; those have the advantages that they become shorter since they are high-density barcodes. If you want to use a Code 128 barcode you need to change the ‘MakeBarcode’ function to generate a string that can be printed as Code 128. I might make a future post about this.
I know that the special character I use (‘$’) sometimes causes issues when used with different character sets or barcode fonts (I have implemented this in different European countries as well as in the US and China). If you bump into this, just open the Codeunit and replace ‘$’ with something else using the replace all feature. I have used ‘&’ in places where ‘$’ didn’t work.
If you are a NAV programmer and you are looking at the code you probably thinking; why not using Record IDs or Positions in the barcodes? That would probably work, but the barcodes then becomes even longer, so I decided to us the special character and separate the primary key fields this way.
This solution works best if the scanner is programmed to submit a return after each scan, then the users does not need to use the keyboard during the scan.
Creating a desktop shortcut for the scanning page on the terminals is not a bad idea, then modifying the MenuSuite is not required and it is easy to find it on the terminal.
Search the Microsoft help about how to create shortcuts.
If you download and use this, let me know what people think!
I know you will like it! 🙂

13 Comments
Leave your reply.