Add Fields to the Item Tracking Lines
This blog post is to describe how fields can be added to the Item Tracking Lines in Microsoft Dynamics NAV. Adding additional fields to this page is a common requirement; it could for example be to add a vendor lot number, some quality measurements, a manufacturing date or any other type of property that should be stored against an inventory lot or serial number.
When you first look at it seems like a simple modification but it is actually a bit (or a lot) more involved than just adding the field to the table and the page.
The Item Tracking Page is in Dynamics NAV built using a temporary table called Tracking Specification, when the page is opened there is code that populate the table with data (if there is anything to display) and when the page is closed there is code that updates the data in a different table (if there is anything to update). That different table is the reservation entry table.
Don’t ask me why it was designed like this. 🙂 It’s been like that as far as I can remember and I have learned to live with it, but I am not sure if I am a big fan of it.
Then during posting the information in the reservation entry table is retrieved and is part of the posting routine. The posting routine populates a temporary Item Journal Line table with one record per lot or serial number and this then creates the Item Ledger Entry records.
The good part with this design is that the item tracking lines page is the same across the entire application, whether you are on a purchase order, a warehouse receipt, a sales order or in an item journal, etc. it is the same page that is opened.
In this example I will add a new field called Vendor Lot No. with the intention to enable capturing the vendor’s lot number against an internal lot number in Dynamics NAV (which is a common requirement).
Adding the New Field
I start with adding the field to the tables involved in this customization, I make it a code field and 50 characters long (to be on the safer side).
The tables where this field needs to be added are (you can copy/paste the field between the tables):
336 – Tracking Specification
337 – Reservation Entry
83 – Item Journal Line
32 – Item Ledger Entry
Next would be to add the field to the Item Tracking Line page (which is page 6510).
You will also need to add code to this page to control when the field is editable and to store the value in the reservation entry table.
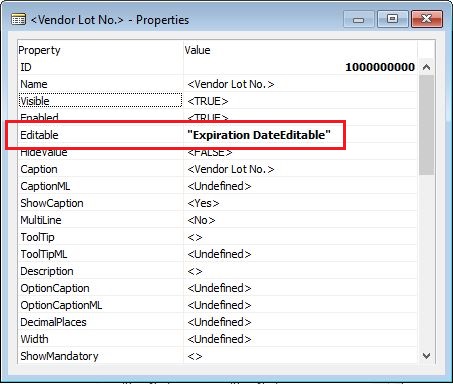
The editable or not editable feature is because the same page is used for both inbound and outbound inventory transactions, and it is only for inbound transactions you want the field to be editable. And in the case of an inbound transaction it should only be editable if the lot number doesn’t already exists (e.g. when you add to an existing lot you don’t want a different vendor lot number). Since this is exactly how the expiration date works, I will simply piggyback on that functionality. I do this by simply setting the Editable property on the new vendor lot no. field to “Expiration DateEditable”.
If you want to use a different logic to define if the new field should be editable or not you will have to define a new global variable and write new code on the page to set it to true or false. This can be fairly easy or very complicated, but you have some examples to use if you search the code on the page (and there is a lot of code in the item tracking lines page).
To test this I can go to an item journal, add a positive adjustment for a tracked item and open the item tracking lines. We then see that the vendor lot no. is visible and can be edited if we add a lot number that does not already exist in the database but if we add to an existing lot is not editable. Then when we do a negative adjustment it is not edible. Perfect! 🙂
Next step is to make sure the data in the new field is stored in the reservation entry table when the page is closed. If you came this far and tested the solution then you will notice that if you close the item tracking lines page and open it again the information in the new field is gone. So, kind of useless so far, but hold on. 🙂
Storing it in the Reservation Entry Table
So to do this we open the code in the item tracking lines page and add the below lines (in this case I basically just searched for the expiration date and added my own lines of code under it since I know that my new field should work the same way);
First change is to add the below code to the RegisterChange function (this function runs when the page is closed):
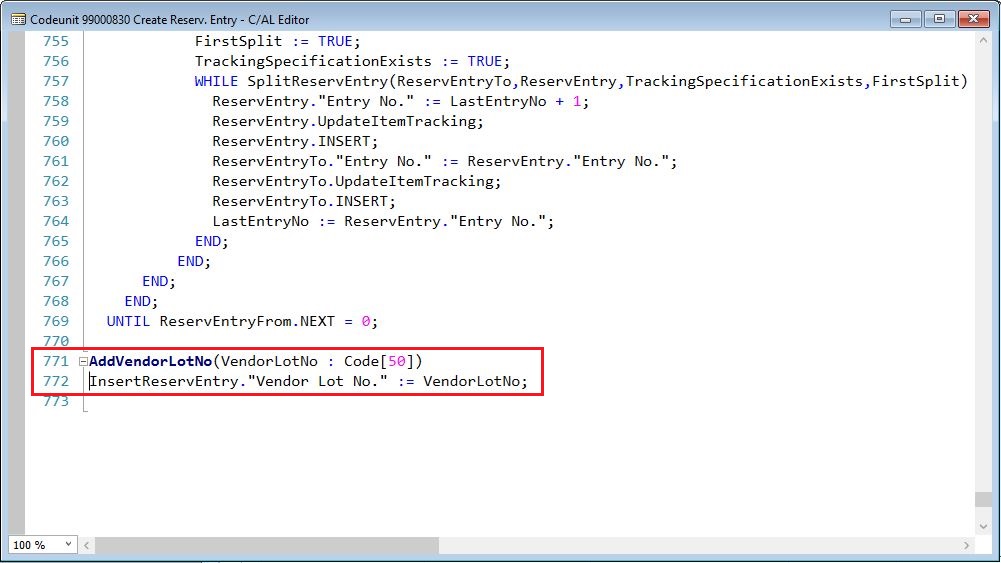
As you can see this code calls a new function in the reservation entry table that we also need to add, it can look like below (as simple as possible);
If I then continue my search for the expiration date in the code of the item tracking lines page I will find some additional places where I need to add my new field, actually two more places in the same RegisterChange function;
Next thing to change is in the EntriesAreIdentical function, this function is used in the RegisterChange function that was modified previously and determines if there are reservation entries that are the same and should be updated.
The next place to add code to is in the ModifyFieldsWithinFilter function.
Last we have the function RegisterItemTrackingLines that needs to be modified according to below.
Again, like the rest of the places above where we have added code we are just following the footsteps of Microsoft by looking at the standard expiration date field and mimicking that code (therefor a lack of explanations to some of the changes).
If you test the functionality now you will notice the data in the vendor lot no. field is stored in the reservation entry table when you leave the item tracking lines page and it is retrieved again when you open the page.
Changing the Posting Routine
Now we have a place where we can enter the vendor lot no. and it gets stored in the reservation entry table. Next thing to do is to make sure this information is transferred to the item ledger entry during posting. As described earlier the code for posting inventory transactions first generates records in a temporary item journal line table and from there the item ledger entries are created. This all happens in codeunit 22 – Item Jnl.-Post Line, so lets open it in design mode and search for the expiration date (since we are lazy we don’t want to read the entire code, just search and do our additions).
When you search for expiration date in codeunit 22 you will notice that there is code to handle changes to the expiration dates, to check if expiration dates are present if mandatory and to calculate the expiration date during posting. Right now we can just find the places that populates the item journal line and then the item ledger entry table (I will get back to changing and making our new field mandatory later).
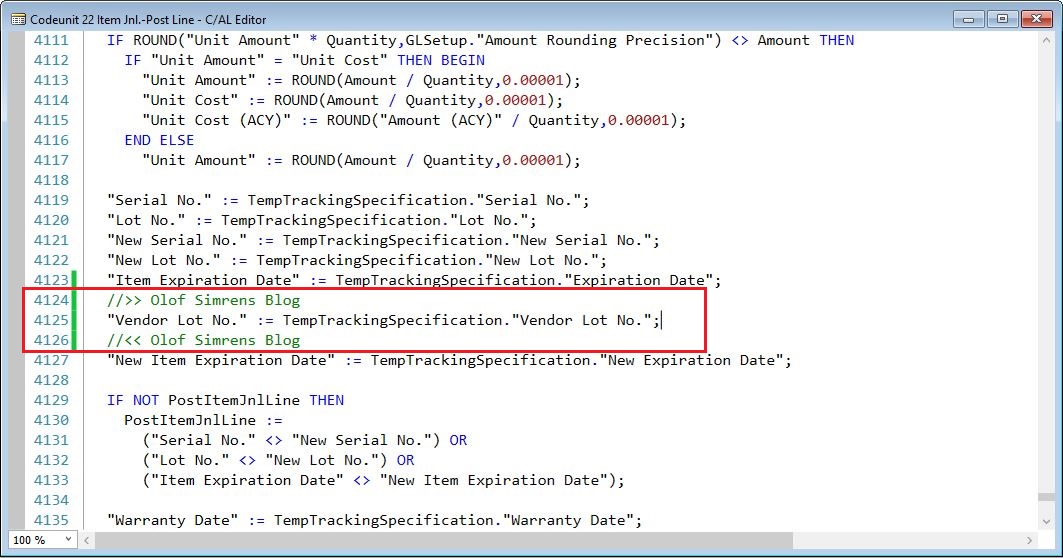
The first place to change is in the SetupTempSplitItemJnlLine function. This is the function that looks at the item tracking stored in the reservation entry table and creates a temporary record for each lot/serial number in the item journal line table. The code to add is as follows;
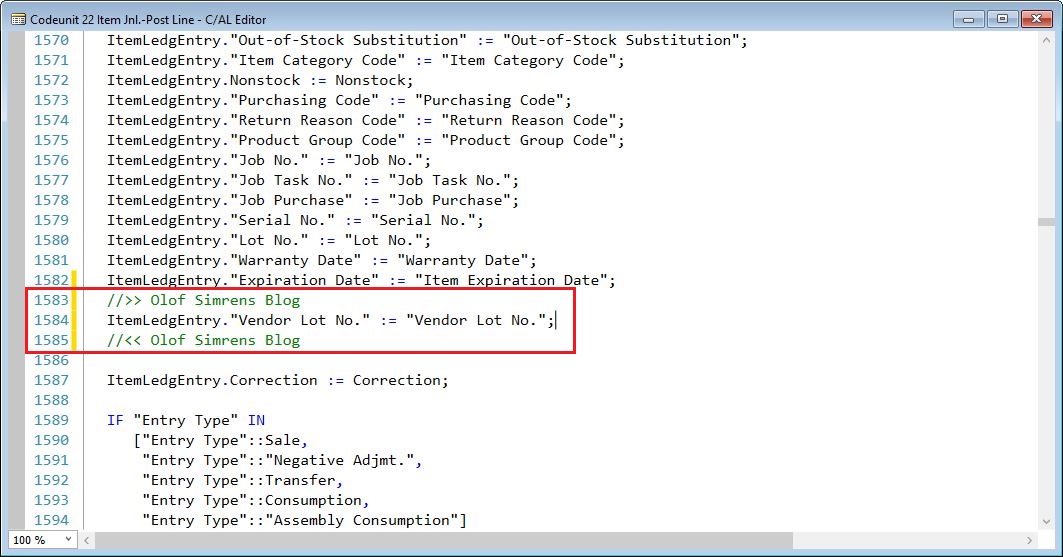
The other place is in the InitItemLedger function, this is what moves the data from the temporary item journal line table to the item ledger entry table.
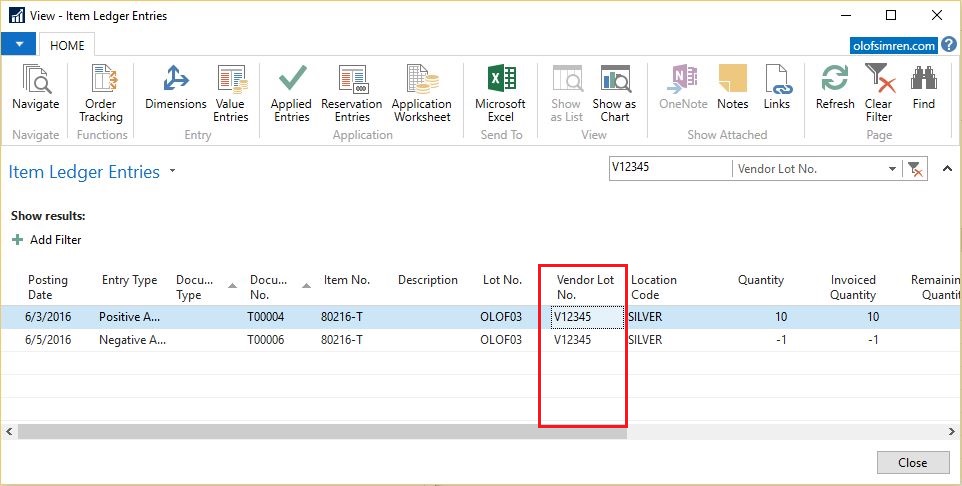
Done! If you post a positive adjustment (or any other type of inbound item transaction) now you should see the vendor lot no. populated on the item ledger entries.
Assigning the value on Outbound Transactions
We have done the part that stores the vendor lot number in the reservation entry table and that adds it to the item ledger entry table during posting. What is left is to make sure it also default into the item tracking lines when an existing lot is selected for an outbound transaction.
There are two places where you need to add code for this, one is in the tracking specification table when the serial or lot number is entered and the other is in the page if it gets opened for something that already have a serial or lot number assigned to it.
For the table; we can do it the same way as Microsoft have done it for the expiration date, so we create a new function called InitVendorLotNo in the table that looks like below (basically a copy of the standard InitExpirationDate function).
This new function is then called on the OnValidate triggers of the serial and lot no. fields.
The ExistingVendorLotNo function in the Item Tracking Management codeunit that is referred to in the new function is kind of the same as the existing one for the expiration date (so I just copied the one called ExistingExpirationDate and changed it to below).
The above is when the serial or lot number is entered, if the item tracking lines pages is closed and then opened again you need to put some additional code to the page to retrieve the vendor lot no., this code is in the AddToGlobalRecordSet function and looks like below (as you can see it uses the same function as the OnValidate code in the table).
Now when we do a negative transaction in the item journal we can see that the vendor lot no. defaults from the lot we select. Nice!
An Alternative to the Item Ledger Entries
An alternative to storing the new field on item ledger entries is to use the tables called Lot No. Information (6505) and Serial No. Information (6504) to store the vendor lot no.
What you need to do in this case is to make sure those records are always created when inventory is added and then add the vendor lot no. field in that table instead of to the item ledger entries (all through codeunit 22). This is less programming and will be simpler if you want to change the vendor lot no. (you then just change it on the card of the lot or serial number), but it will not be transactional based and it will be slightly different compared to how Microsoft have done it with the other fields.
Changing an Existing Lot or Serial No.
Creating the code that allows you to change the Vendor Lot No. using the item reclassification journal (the same way as you can change the expiration date) is a topic by itself. If you have followed what I described above you have probably noticed that in a couple of places there are fields that starts with ‘New’ like New Expiration Date, New Lot No., etc… So to have a proper feature to update the vendor lot no. on an existing lot you will have to add the New Vendor Lot No. field to the same tables (except the item ledger entry table) and add lines of code to handle that part as well (again mimic the standard functionality around expiration dates).
I might do a future post describing this (like a part 2) and also how to make a new field like this mandatory when adding new lots to inventory.
This blog post turned our way more technical that what I initially had planned, but I guess that’s the nature of adding a field to the item tracking lines.
That’s all for this blog post, thanks for following and have a great day!
Remember to share this post as well! 🙂
17 Comments
Leave your reply.