Assemble to Order with Inventory Picks and Movements
One of the nicer things about the assembly functionality in Microsoft Dynamics NAV is the option to assemble to order. What this means is that you can stock the components and not assemble them until it is time to ship the order (very useful if you sell kits of products for example).
In this blog post I will describe how this works together with the inventory picks and movements. This is in my mind a setup that works well and supports scenarios where the personnel that are picking the products also assembling/bundling them at the same time.
I have previously described the different ways of processing shipments in Dynamics NAV and the inventory pick option I use with the assembly functionality in this example is option 2 from that blog post.
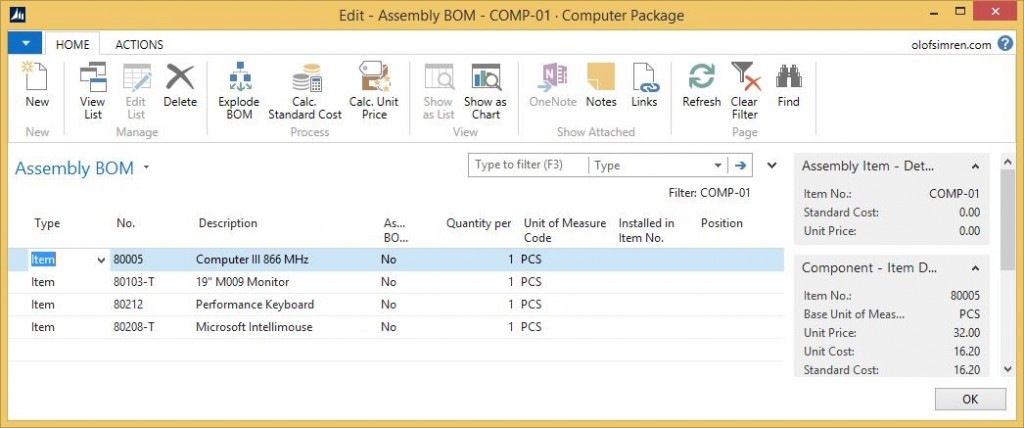
The example will be described using a computer package that consists of a computer, monitor, keyboard and mouse. They are all items that are stocked individually and also can be sold individually. The computer package itself has its own price and are marketed as a product.
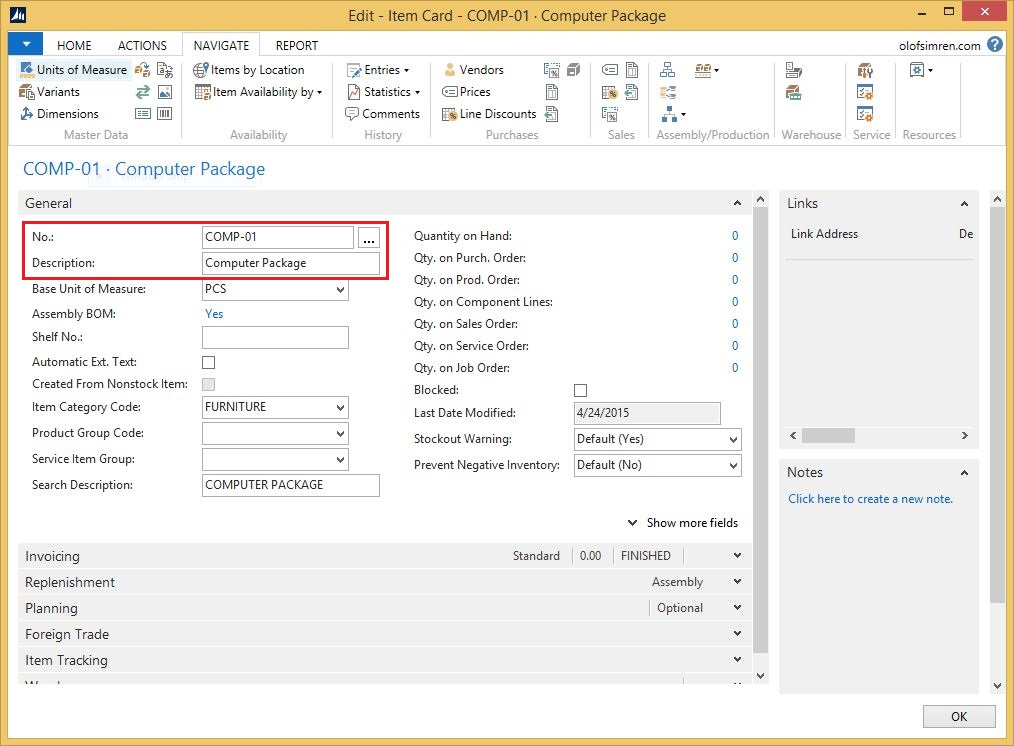
For this we first create an item representing the computer package. In the below case I make it item number ‘COMP-001’ and the description computer package.
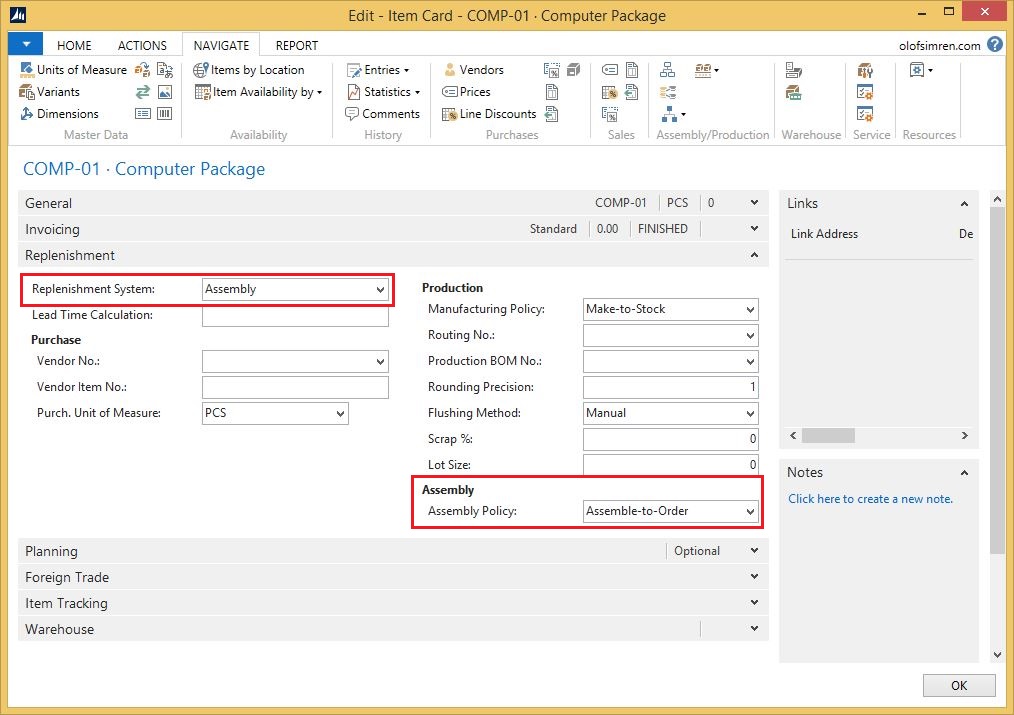
Next we setup the replenishment tab with the replenishment system equal to assembly and the assembly policy equal to assemble-to-order.
We also need the assembly BOM to define what items that the computer package consists of.
That’s it for the setup of the item (you might also want to put on dimensions, prices, do a cost roll, etc. but that is outside the scope of this blog post).
The concept is now to place a sales order for the computer package and create an inventory pick to pick and ship it. Dynamics NAV will in this process first create an assembly order in the background when the sales order line is entered (to assemble the components) and an inventory movement when the inventory pick is created (to move the components to an assembly or shipping bin from where it is shipped). Posting the inventory pick will then post the consumption of the components, the output from the assembly and the shipment of the sales order, all with one click. Nice!
Some of you might have worked with the kitting functionality that previously came standard in certain local versions of Dynamics NAV (it was standard in the North American version of NAV for example). The assembly functionality has replaced this kitting functionality and it is worth noting that the process is slightly different. The old kitting functionality did actually create an inventory pick with the components, while now it creates an inventory pick for the assembly and an inventory move for the components. Good to know if you are upgrading!
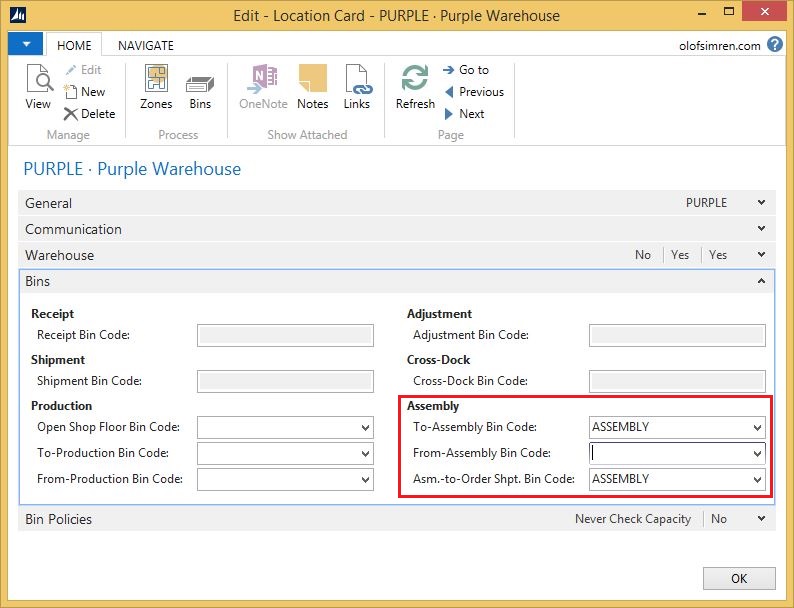
For it to work we need to define the assemble to order shipping bin and the to-assembly bin codes on the location card, this is where the components are going to be assembled at and from where we are going to ship the assembly sold. In my case I have a PURPLE location setup with bin mandatory and require pick, and the bin where the assembly takes place in is called ASSEMBLY (you could potentially have two different assembly bins here to separate the components from the assemblies).
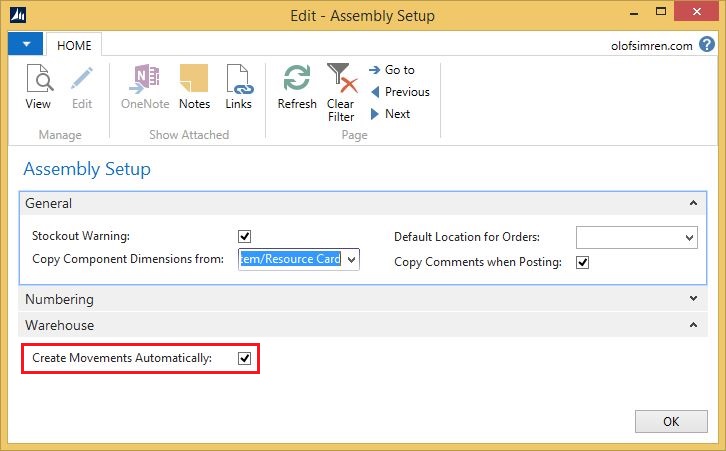
To have the inventory movement to be created automatically during the creation of the inventory pick we need to activate this in the assembly setup table.
This should be it, let’s try it. 🙂
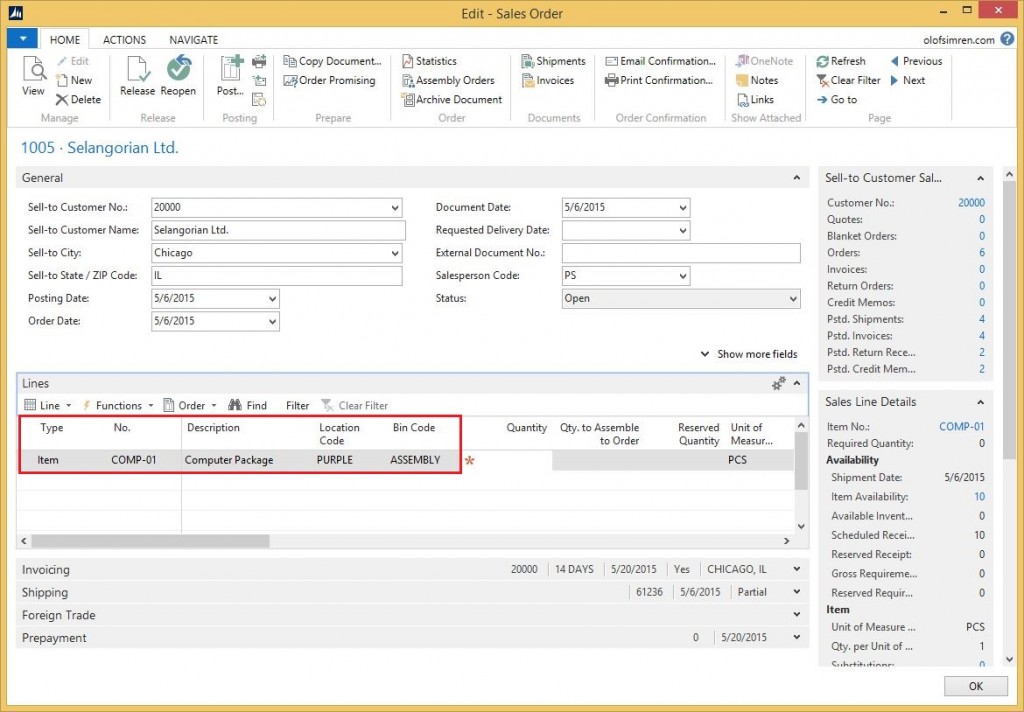
First we create a sales order where we enter the computer package as a line item.
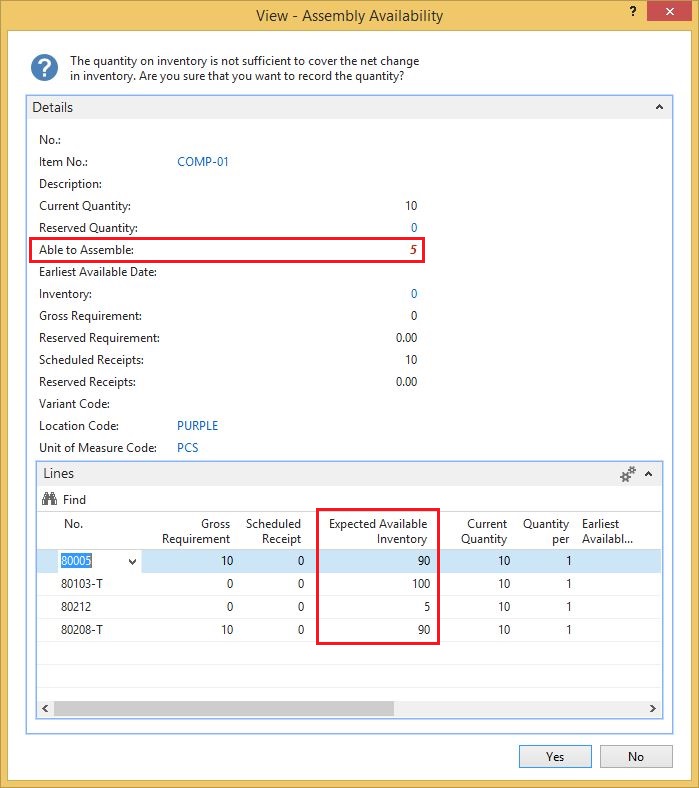
When the sales line is entered NAV knows that this is an item that is setup as being assembled to order so it checks the availability of all the components instead of the item being placed on the sales order and if one or more of the components are not available an availability warning like below will be displayed (if that feature is activated in the inventory setup/item card that is). This I think is really nice.
As the availability warning shows, I am short of item 80212 and are only able to assemble 5 computer systems. The quantity of 10 can be accepted anyway as this is just a warning.
Also note that the bin code on the sales line defaults to the bin code defined as the assemble to order shipment bin code defined on the location.
Next step is to create the inventory pick. For regular items, the inventory pick is created based on the qty. to ship on the sales order line (a way for the order entry person to control if not all items should be picked) and the availability of the item, but for assemble to order items the inventory pick is created based on the qty. to assemble to order field on the sales line and independent of the item availability. I guess this makes sense if you think of it as this is the quantity that is going to be assembled and therefor is what you want to pick.
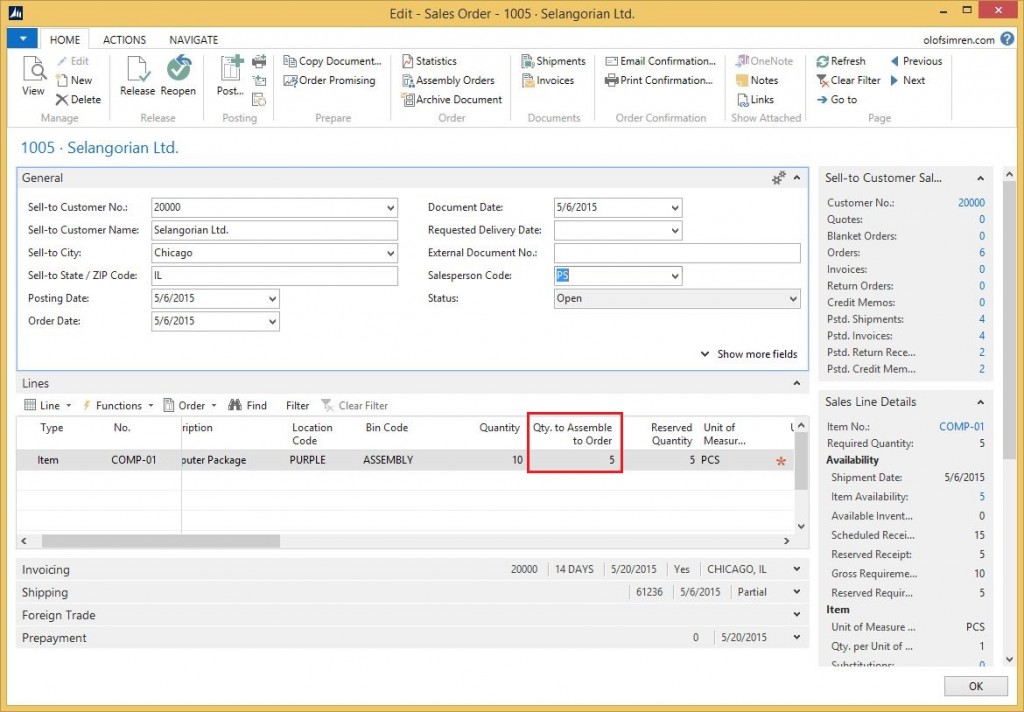
In my example I am only able to assembly 5 systems and therefor I will change the qty. to assemble to 5.
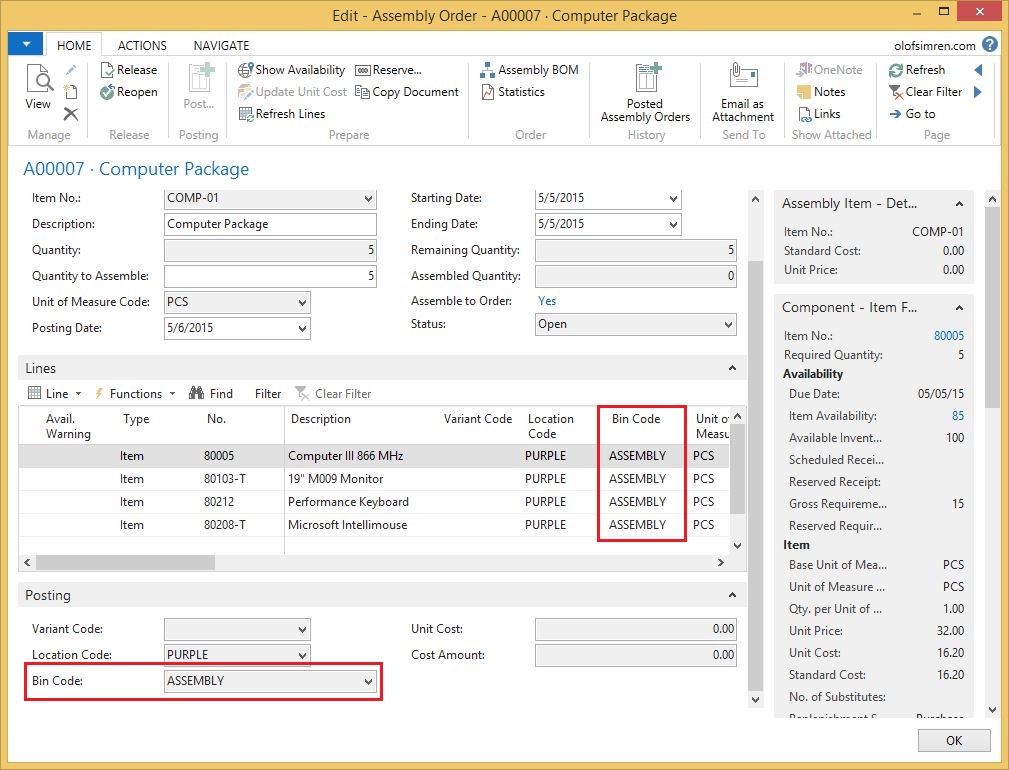
Changing the qty. to assemble to order field automatically updates the assemble order that Dynamics NAV created in the background when the sales order line was entered. You can navigate to the assembly order from the sales line by making a drilldown on the same field. Note the bin codes for the output in the header and the consumption on the lines, they all come from the location card.
Note that without changing the qty. to assemble to order field to 5 the assembly order will still show a quantity of 10 and the inventory pick will be for 10 pcs, but the inventory movement will only be for the components that are available. This is one thing that I think could be argued. If I was designing this I would have the inventory pick to be for what was available to assemble and the inventory movement to only move components that could be used to complete full assemblies (e.g. 5 of each, and not 10 for all except one of the components). This should not be that hard to change though since the inventory pick and movement is created at the same time (maybe something for a future blog post).
The assembly order in this case is nothing to worry about since Dynamics NAV will take can of it automatically when the inventory pick is posted (but it is good to know that it is there in the background and how it looks).
The sales order is then released and the inventory pick is created, typically through a batch job (see previous blog post related to processing shipments). This also automatically creates an inventory movement for components that goes into the assembly.
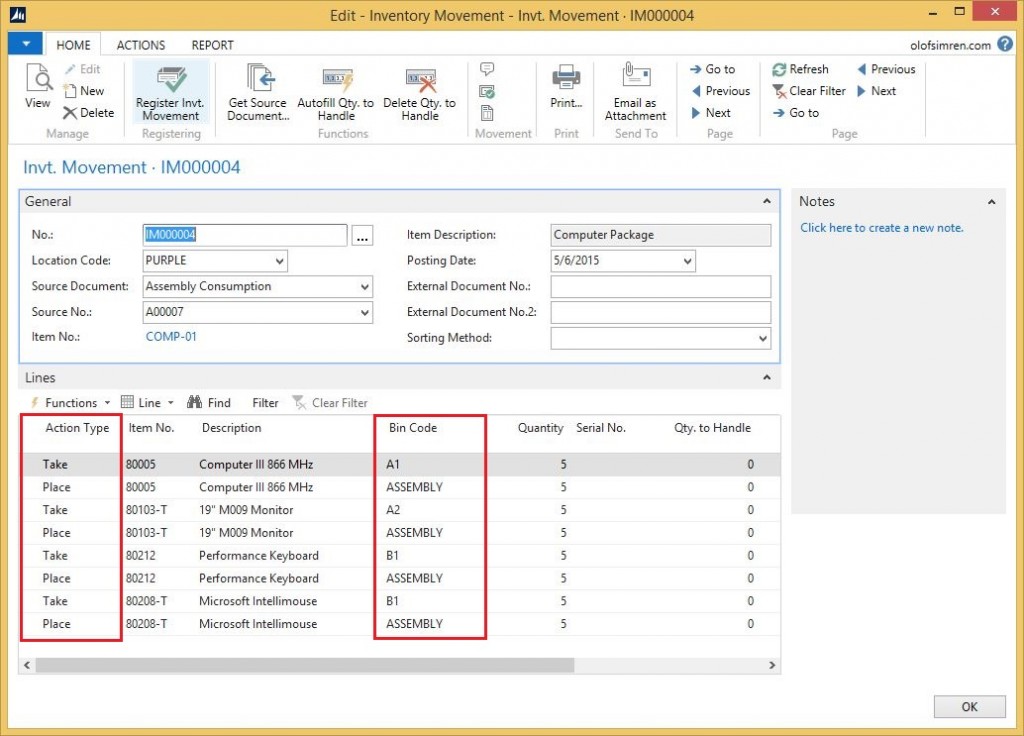
The inventory movement looks like below. Note the take and place actions that moves the components from their corresponding bins to the assembly bin.
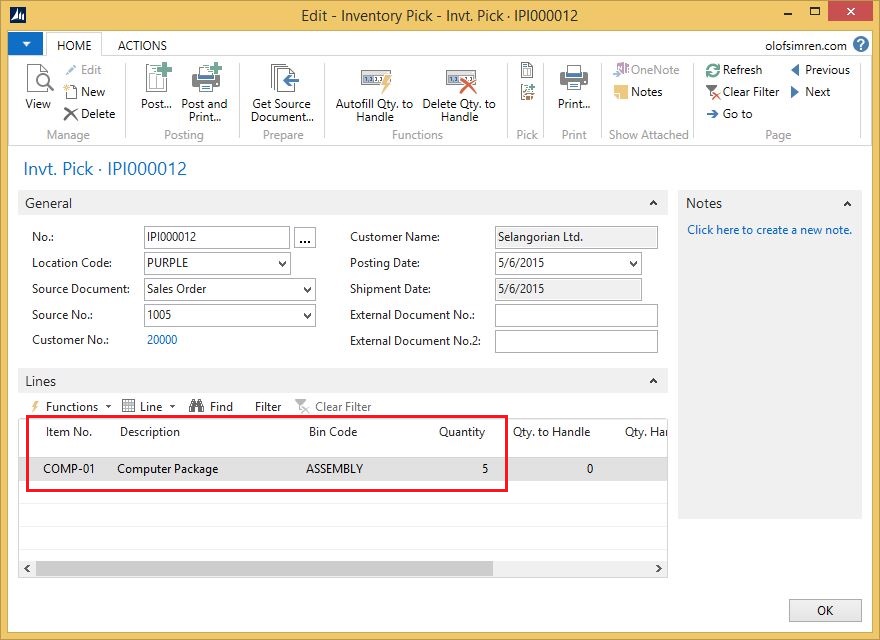
The inventory pick looks like below, shipping 5 pcs of computer system from the assembly bin.
Register the inventory movement then moves the components to the assembly bin and posting the inventory pick consumes the components, posts the assembly output and ships the sales order. Note the terminology difference; ‘register’ vs. ‘post’. Register does not create any g/l entries (only warehouse entries).
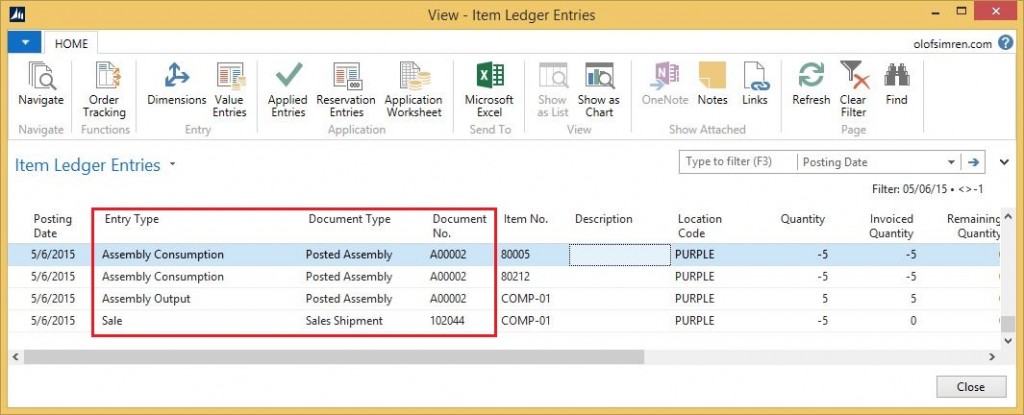
The result in the item ledger looks like below. The consumption of the components are first posted, then the output of the assembly order, and last the shipment. The document numbers comes from the posted assembly order and the sales shipment.
Note that using the inventory movement in the above example is optional. If you leave the to-assembly bin code blank on the location card then the assembly order will be created with bin codes on the lines according to the default bin codes of the items and there is no need for a move. This might be a simpler solution if you don’t have the same items in multiple bins (e.g. if the on hand quantity for an item is always in the default bin then it will work fine without the inventory movement).
Have a look at my shop floor barcode solution if you want to simplify the registration/posting of the inventory movement/pick. There is a potential to have the printout of the inventory pick to display the lines from the inventory movement together with a barcode to scan to register it. If you display the inventory movement lines on the printout of the pick then it becomes almost like the good old kitting functionality.
If you in the decision of whether to use assembly of manufacturing for a requirement, then check out my previous blog post assembly vs. production.
That’s all for this time! Let me know your experiences with the assembly functionality! Both negative and positive comments are appreciated on this blog, but no spams promoting your add-ons please.
Make sure to also visit my Dynamics NAV FAQ page. 🙂
10 Comments
Leave your reply.