Return Merchandise Authorization (RMA)
This blog post is about the return merchandise (or material) authorization process in Microsoft Dynamics NAV, this is another topic that is more or less always discussed during Dynamics NAV implementations.
The typical scenario is that a customer calls and wants to return a product that they have purchased to get a refund, replacement product or to get it repaired. For this they need an authorization, an RMA.
So, how is this done in Dynamics NAV? The short answer is by using a sales return order, which is similar to a sales order but it goes the ‘other way’ and is received instead of shipped and creates a credit instead of a debit on the customer. That sounds easy! Well, it is a bit more involved than that, because you have to take care of the product once it is received back and make a decision about what to do with it. In a lot of cases this involves several of the departments within the organization (customer service, quality, manufacturing, purchase, accounts receivables, etc.).
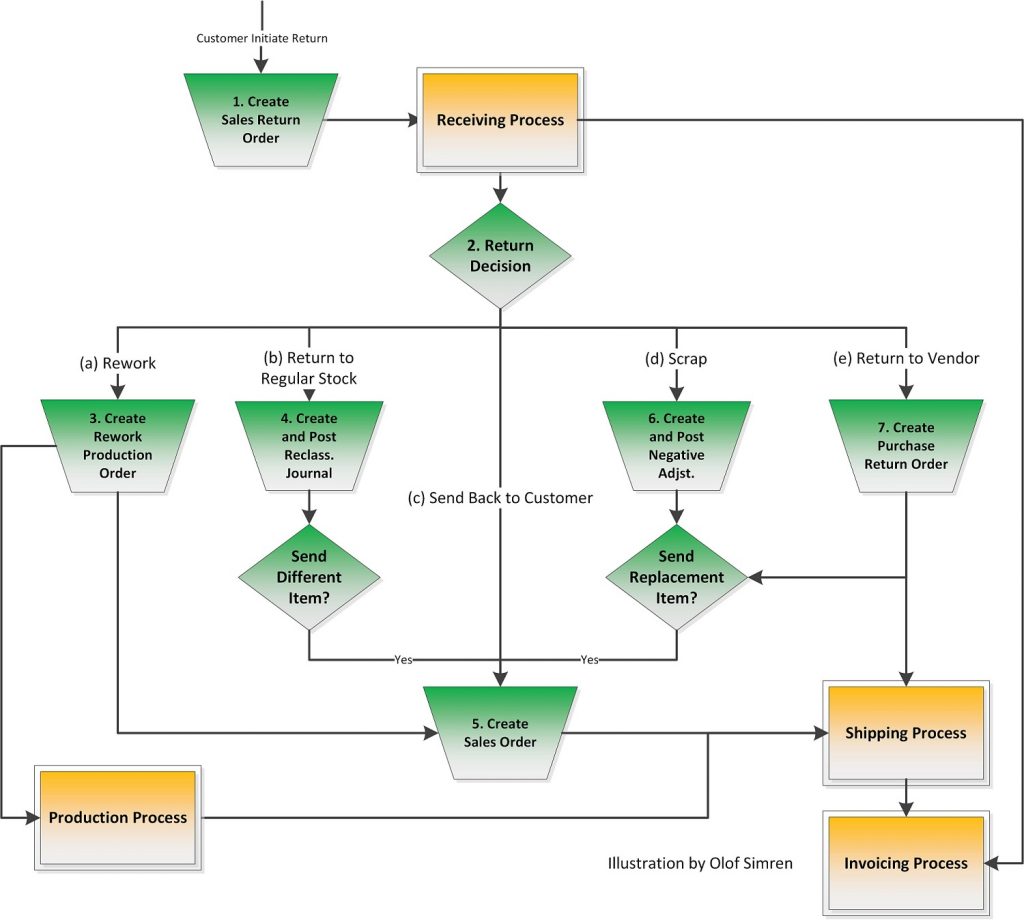
The below illustration is something that could be used during implementations to explain the scope of the process.
Each of steps are described below with some tips that I hope will be useful for you.
1. Create Sales Return Order
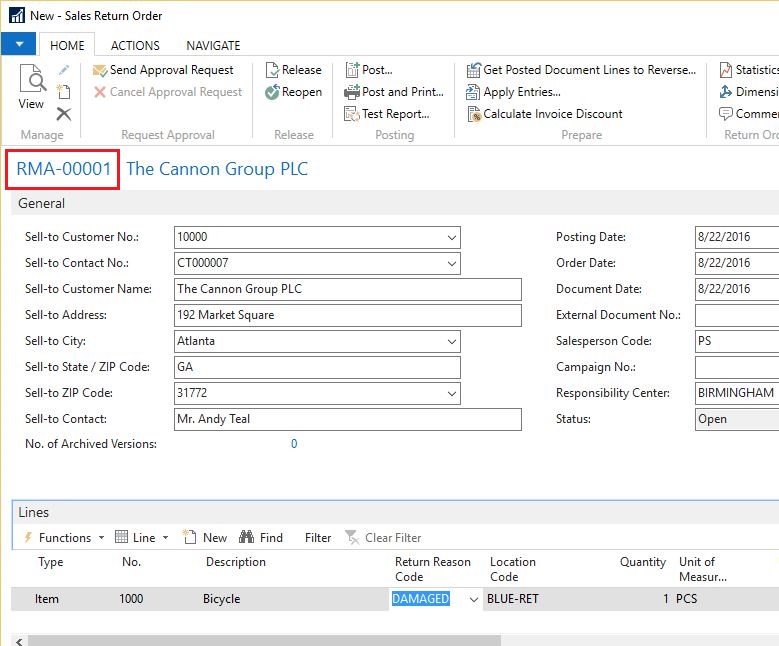
It starts with a customer that initiates a return by requesting an authorization to send the product back, this could be a phone call (either friendly or angry 🙂 ) or an e-mail. In Dynamics NAV you then create a new sales return order which will give you the RMA number that should be used by the customer to return the product. To make it clear I normally recommend to setup the number series for sales return orders to ‘RMA-00001’ (or something similar) since the term RMA is more known than the sales return order term (I love prefix on number series by the way). On the printout of the sales return order that is sent to the customer; call it Return Authorization instead of Sales Return Order (less confusing for the customer this way).
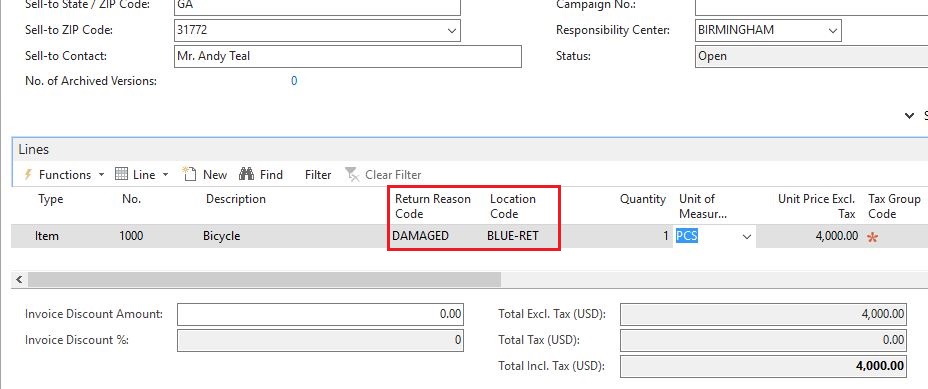
When entering the line(s) there are two thing to consider; (1) what location code it should be returned to and (2) the return reason code.
The location code should be a separate dedicated return location, this way you are not mixing returned products with your regular inventory and if you run any type of planning or MRP then the product being returned are not considered supply that nets the demand. If your regular location is called ‘BLUE’ then create a return location called ‘BLUE-RET’ (as an example). This location can also be refereed to as quarantine, quality control, on hold, etc. and could also be used for setting aside products that you don’t want to show up as available in the availability logic.
The other effect of having separate return location is that you can setup a separate inventory account where the value of returned products are posted to in the balance sheet.
Note that bringing the inventory back into a separate location does not work that well with the exact cost reversing feature that Dynamics NAV has since it want you to get the product back into inventory with the same cost as it was shipped by linking the two transactions (the original shipment and the return) and this requires them to be on the same location. My preference is to have this feature turned off and train the users to be good enough to understand when to select the apply-from entry no. (e.g. when making corrections to postings) and when it is not needed (and how the costing works on return orders).
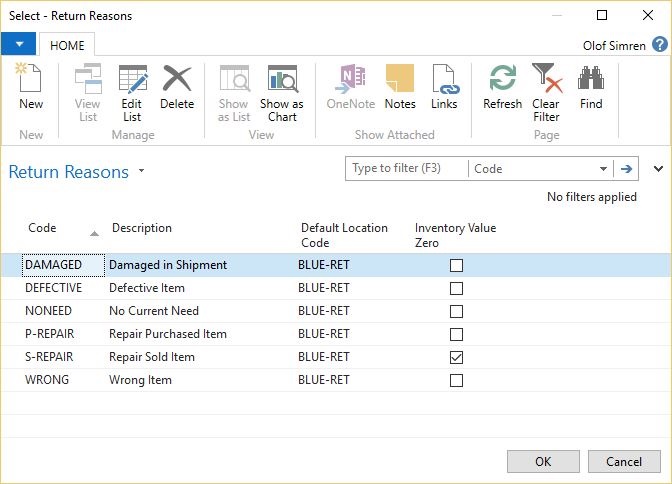
The return reason code should indicate the reason why the customer wants to return it, which is not always the reason the sale failed. This is a mandatory field and you can setup as many codes as you want. Note that there are some additional options that you can configure for each of the codes, one of the options being if the returned product should have zero inventory value, you should know that this option does not work with standard cost items.
It is good to know that this list of return reason codes are shared between the sales return orders and the purchase return orders (just something to think about when you define the list).
For the amount you should enter what you expect to credit the customer, this value can be changed later (if you for example reserve the rights to inspect the returned product before you decide what to credit the customer or if the freight should be deducted, etc.).
Once the sales return order is entered it gets released and the printout is send to the customer for them to include it with the products being returned (I normally add text like ‘return a copy of this page with the product’ on the printout, this makes it easy when it comes to receiving and finding the right order to receive).
The receiving process when the product shows up is the same as for other types of orders that are received (purchase & transfer orders). Note that the different options for receiving are configured by location, so having a separate receiving location also allows you to have a different receiving process if required. If you are using warehouse receipts (my favorite configuration) then the just receiver need to choose between the two locations depending on if it is a return or a regular purchase that is received.
2. Return Decision
When the product have been received there is typically an inspection taking place and based upon that a decision about what to do with the product is made (I refer to this as a return decision). It can either (a) be subject for rework, (c) be returned to regular stock, (c) send back to the customer again (popular for the customer 🙂 ), (d) be scrapped or (e) be returned to the vendor.
Note that Dynamics NAV does not natively have a quality control module, but there are a handful to choose from (Naviona sells one as well) that could be used to capture the result of an inspection and the determined fault reason. The other option is to use a separate quality control software (or a good old Excel spreadsheet).
Depending on what decision that is made the next steps in Dynamics NAV are obviously different (see flow chart above).
3. Create Rework Production Order
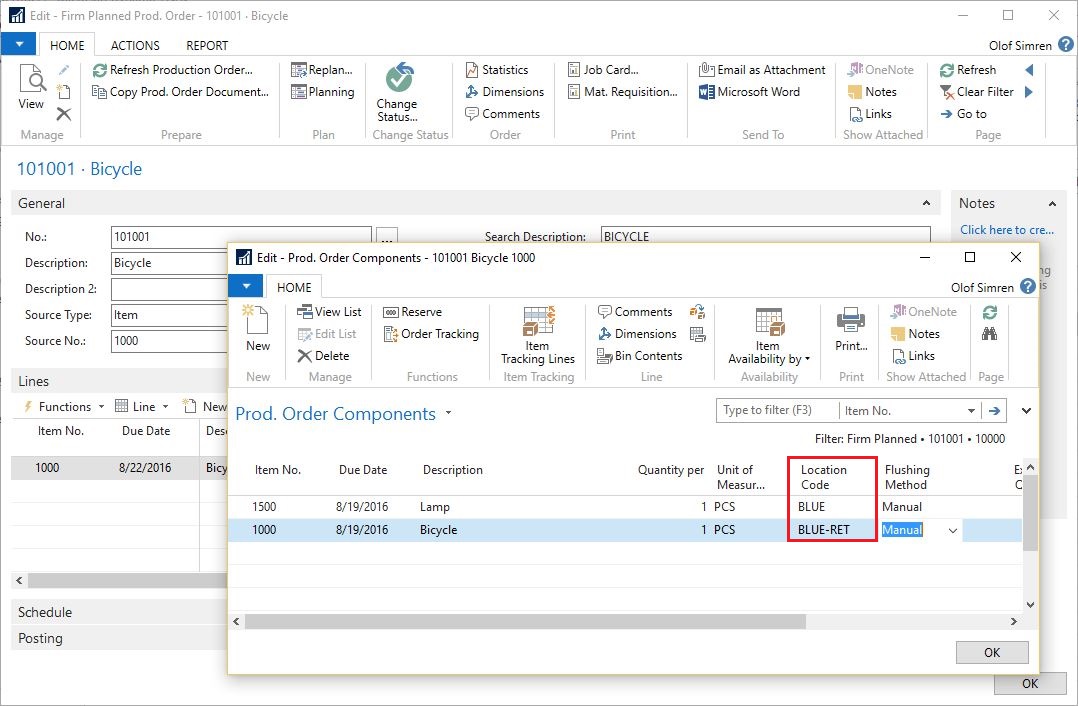
If the returned product needs rework (e.g. need to be fixed) then a rework production order should be created. The best way of doing this is to create a production order manually for the returned product on the return location and then go to the components and exchange them against the returned item and add any components that are needed for the rework. The components needed should then come from the regular inventory. In the below example a bicycle have been returned by the customer and the rework involves replacing the lamp, so the returned bicycle becomes a component that is consumed from the return location and the lamp becomes another component that is consumed from the regular location. The output of the production order is a bicycle as well that goes into the return location.
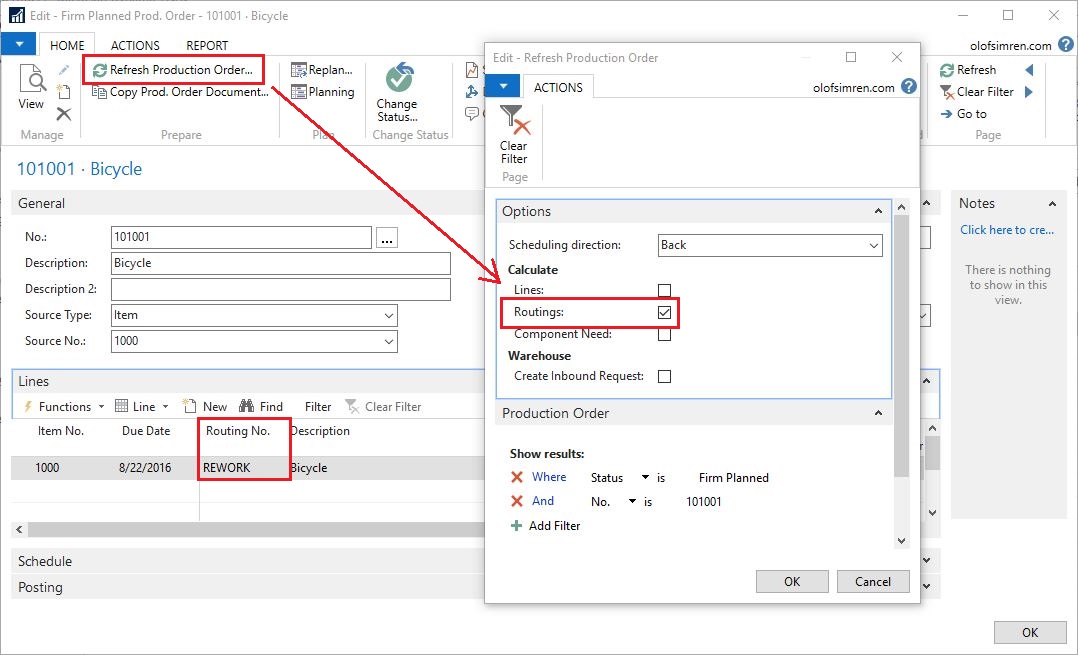
Also the routing needs to be altered to reflect how it is going to be reworked/fixed. To simplify this you could have a separate generic rework routing created (that includes something like a rework work center with some costs attached, which all can be changed on an order by order basis). What you do then is just to replace the routing no. on the line and refresh the production order and only calculate the routing.
In a FIFO environment the finished product of a production order like above will have the cost of the returned product plus the additional components plus any of the rework operations capacity costs. In a standard cost environment the finished product will have the same cost as the original finished product and any additional components or rework costs will be a variance posted into the P&L (note that the cost of the bicycle component will be considered material cost even though there is a labor and overhead portion in it).
Once done you release the production order and it is completed like you complete your regular production orders. The output of the finished product will go into the return location from where it can be shipped back to the customer.
Note that if you are handling a make to order or configure to order type of product then the sales order is maybe needed to be created before the production order (if it requires a configuration on the sales order or a link between the sales order and production order).
4. Create and Post Reclass. Journal
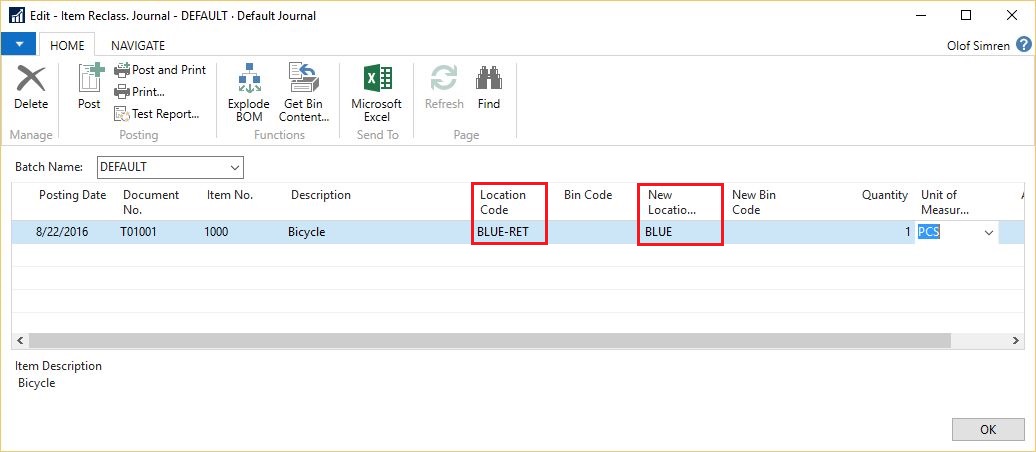
If the product that is returned from the customer is a good product then it could potentially be returned to the regular stock. This can be done with an entry in the reclassification journal to move it from the return location to the regular location. If you are using directed-put-aways and picks (also known as advanced warehousing) then this process becomes slightly more difficult and needs transfer orders.
If you are using bins then you obviously need to enter those as well.
5. Create Sales Order
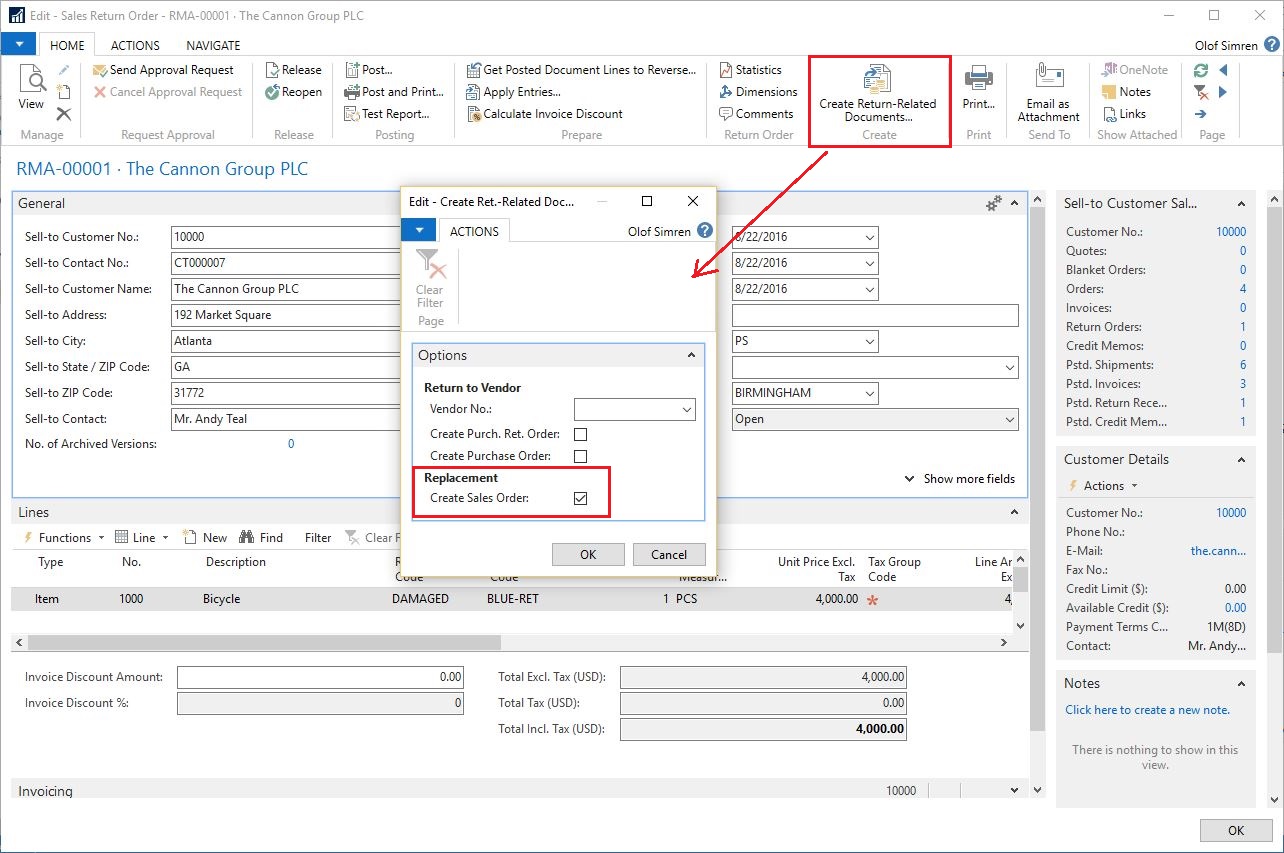
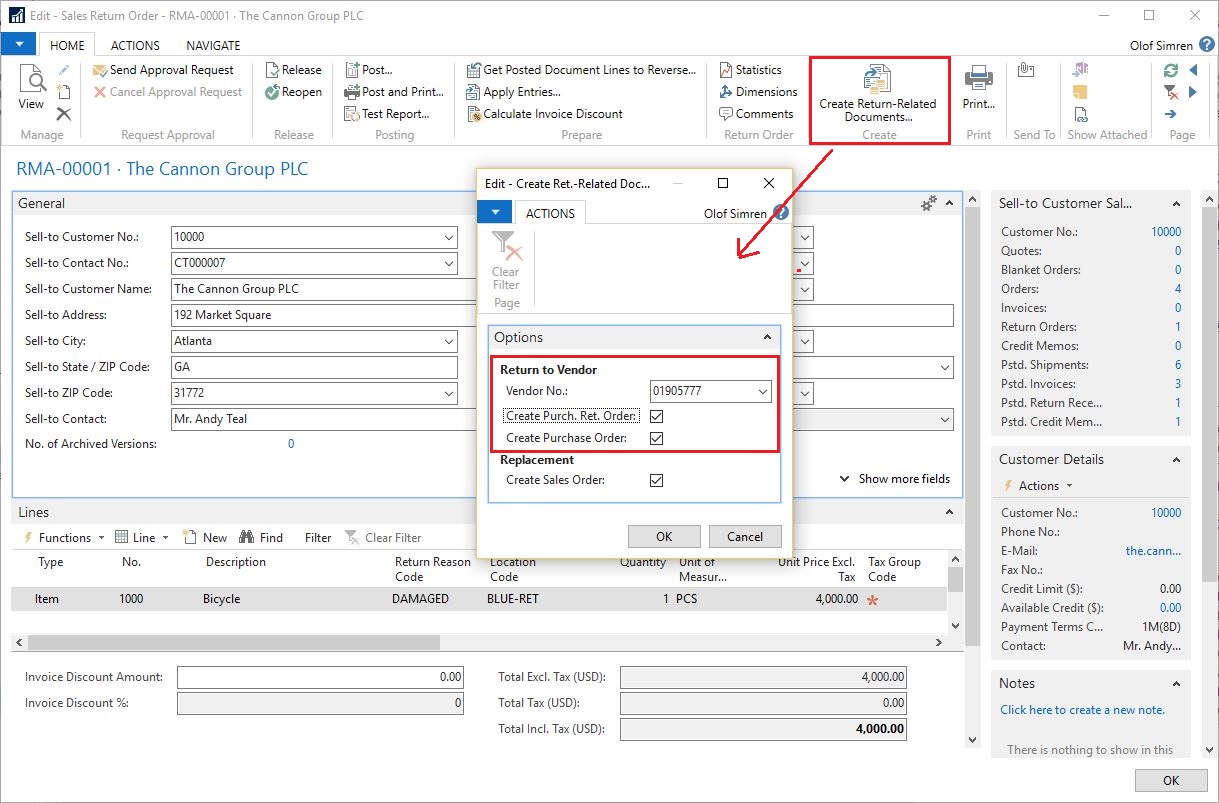
If something is going to be sent back to the customer (which is common) then you need to create a sales order process it. One way of doing this is to use the feature called Create Return Related Documents that you have on the sales return order, this will create a sales order for the same customer with the same item(s) etc..
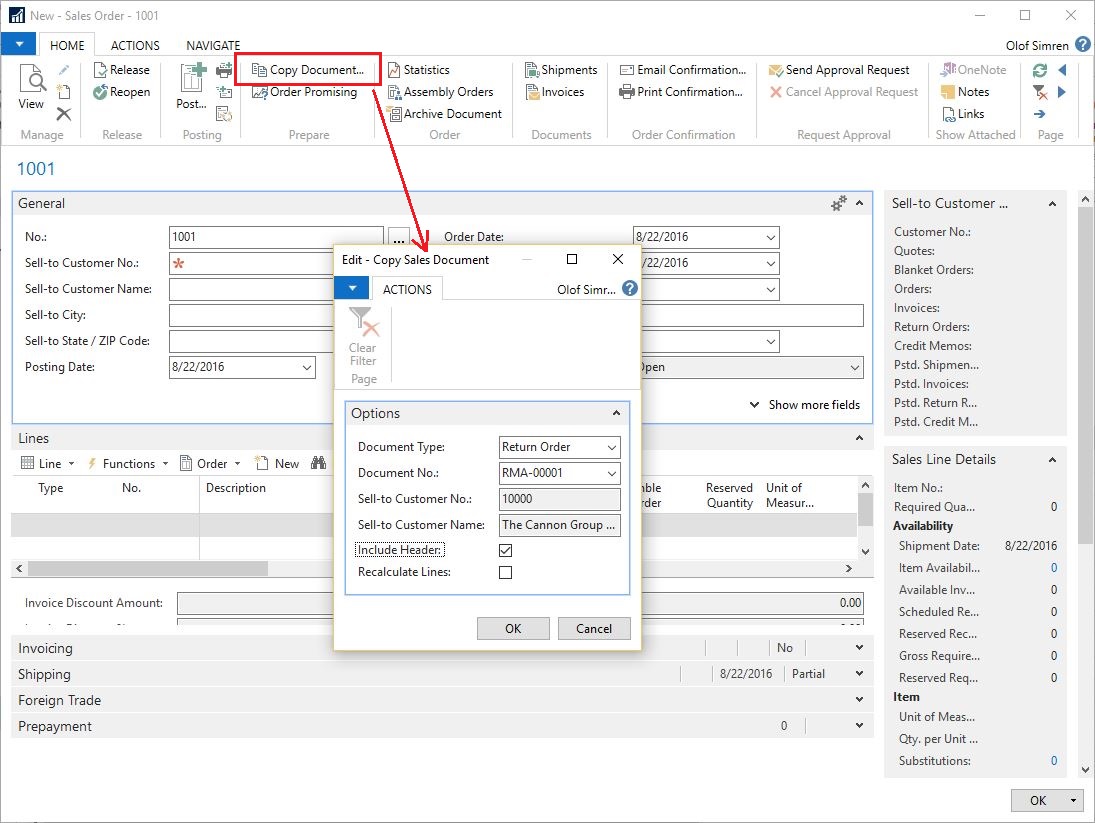
The other option would be to use the Copy Documents function and from the sales order page copy the sales return order.
In both cases you need to be aware of the location code on the lines, if you are returning something that have been reworked (using the rework process described above) or if you are simply returning the product as it was received then you want to return it from the return location. If you are sending a replacement item or a completely different item it should be sent from the regular inventory location.
6. Create and Post Negative Adjustment
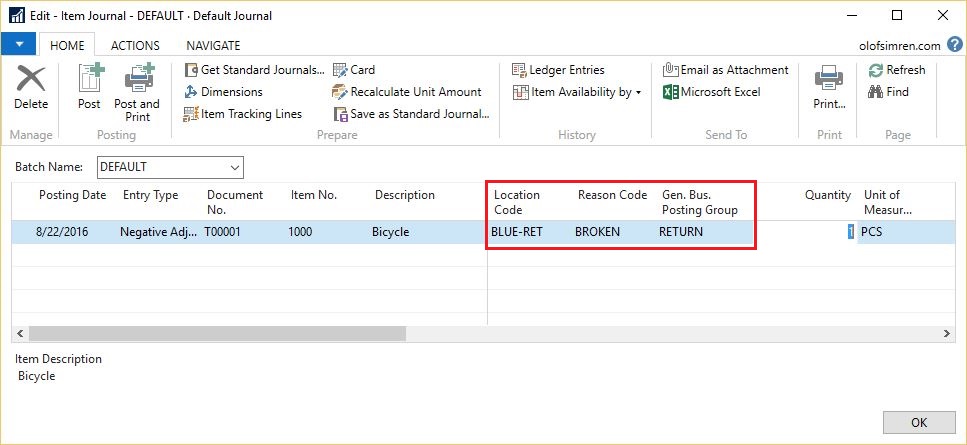
If the item returned from the customer should be scrapped then you can just do a negative adjustment in the item journal. I always recommend using the reason code when doing those types of transactions, but the fact that the adjustment is made on the return location gives you a hint on why it was done when you two years later are looking through the transaction details and wondering why you made the adjustment.
You can also use a separate general business posting group if you want the cost of the product to be posted against a specific general ledger account (and/or a use a dimension to separate different types of adjustments from each other).
7. Create Purchase Return Order
If the item returned from the customer is a purchased part then it should potentially be returned to the vendor. The Create Return Related Documents feature at the sales return order page can also be used to create the purchase return order to send the product back to the vendor.
As you can see from the screenshot above, it can also create a new purchase order in addition to the purchase return order, the purpose of this is obviously if you want the vendor to send you a replacement. Kind of nice that that documents can all be created at the same time like this.
Shipping and Invoicing
The shipping process for the purchase return order and the new sales order is the same as any other shipping process that you have in Dynamics NAV. And the invoicing process is also the same. One thing to be aware of when invoicing is that the invoice is applied to the credit memo.
That’s all for the RMAs, comments below are always welcome as well as sharing this post on social media using the share button below to the right. 🙂
Cheers!
10 Comments
Leave your reply.