Schedule MRP
If you have a relative large number of items to plan it could take a while to run the MRP calculations in Microsoft Dynamics NAV, an hour to do a full calculation is not uncommon, especially if you have been using the system for a while. In order to not have the MRP calculations to interrupt with the daily operations (such as posting orders) you typically want the calculations to take place during the night.
This is a very common requirement and in fact a lot of people I talk to are surprised that this is not something Dynamics NAV can do out of the box. Luckily, with some minor changes it is quite easy to get it to run using the Job Queue (which is scheduler in NAV).
With the help of the Job Queue you can get Dynamics NAV to run the full MRP calculation during the night so that the planner(s) always have a fresh list of suggestions (action messages) when they show to work in the mornings.
Below is how it can be done, I have described two ways of doing it, one ‘simple’ way and one more ‘advanced’ way. Both examples can be downloaded in the downloads page of this blog.
The Simplest way of running MRP in the Job Queue
Let’s start with the simple way of doing it. This is suitable if you want to run the entire MRP calculation at once and have it all presented in one worksheet.
The overall approach here is to create a codeunit that will run the calculate regenerative plan and populate the planning worksheet the same way as if a user would do it if it is run manually. The codeunit is then scheduled through the job queue to run during the night.
To do this we start with creating a new codeunit. Since the codeunit is going to run through the job queue we should set the TableNo property to the ‘Job Queue Entry’ table (table 472) in order for it to run.
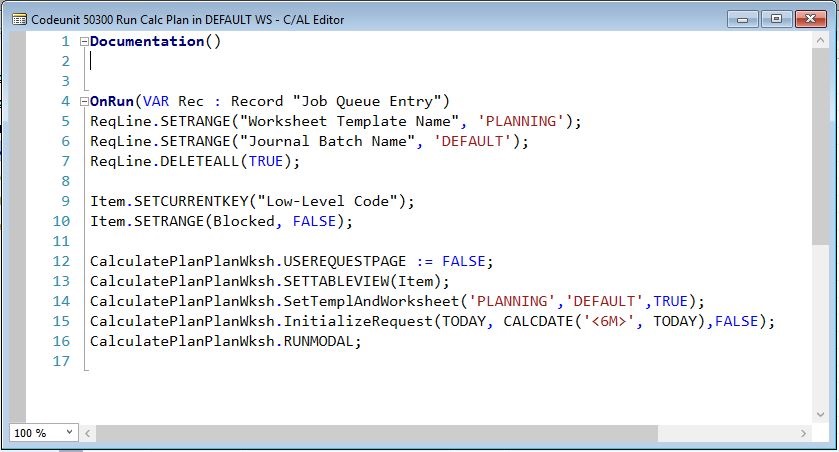
Next we write the code that initiates and runs the calculate regenerative plan the same way as a user would do it if it is run manually. The code could for example look like below where it starts with deleting the lines in the worksheet (line 5 – 7), then it set the key and filters on the item table (line 9 – 10), the main thing here is to make sure that the items are calculated according to their low level code (see low level code for more about the low level codes), then the plan is calculated (line 12 – 16) which is report 99001017 that is run without displaying the user request page (using the USEREQUESTPAGE := FALSE syntax).
In the above code the line 14 is used to set the worksheet template name and worksheet name as well if the plan is regenerative. This has been hardcoded to simplify this illustration, I would normally recommend that parameters like this are defined in a setup table instead. Same goes for line 15 where the starting and ending dates for the plan is set (in the above case 6 months from today).
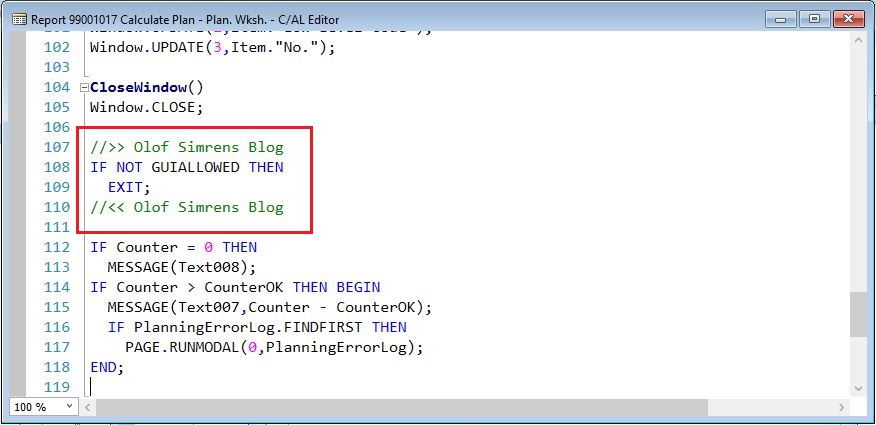
Now we have the codeunit to schedule in the job queue, but there is one more thing that needs to be done; when the MRP calculation runs and it discovers errors then those errors are logged and displayed to the user on a page that opens in the end of the MRP run. This can obviously not open when the MRP calculation is run through the scheduler (since there is no user interface), so the code have to be altered slightly. There is a syntax called GUIALLOWED that enables you to write an IF statement to skip code when executed through the job queue. So, we need to modify report Calculate Plan – Plan. Wksh. (99001017) according to below. This will just exit the CloseWindow function that has the code to display the page if the code is run through the scheduler.
If this is not added the Job Queue will log the following error and the MRP calculation will not run:
If you are on an older version on NAV you also need to add this IF statement around all the code where NAV calls dialogs. The dialogs are typically called ‘Window’ so you can just search for ‘Window’ and add ‘IF NOT GUIALLOWED THEN’ before each appearance of a Window.OPEN, Window.UPDATE and Window.CLOSE. Luckily we don’t need to do that anymore in the later versions of Dynamics NAV, thank you Microsoft! 🙂
Note that the user that is reviewing the MRP suggestions will still have access to the error messages from the planning worksheet.
Now we have all that we need to schedule the MRP run through the job queue. Nice and easy! 🙂
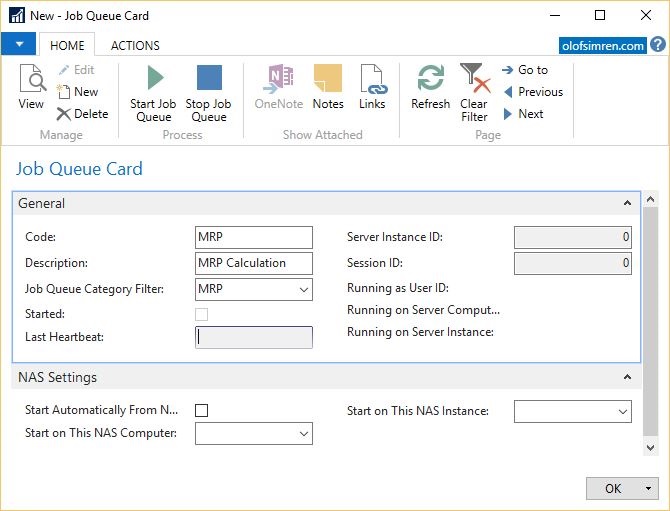
I recommend to setup a separate job queue for running the MRP calculations, this way it will not interfere with other tasks that are scheduled.
Something like below.
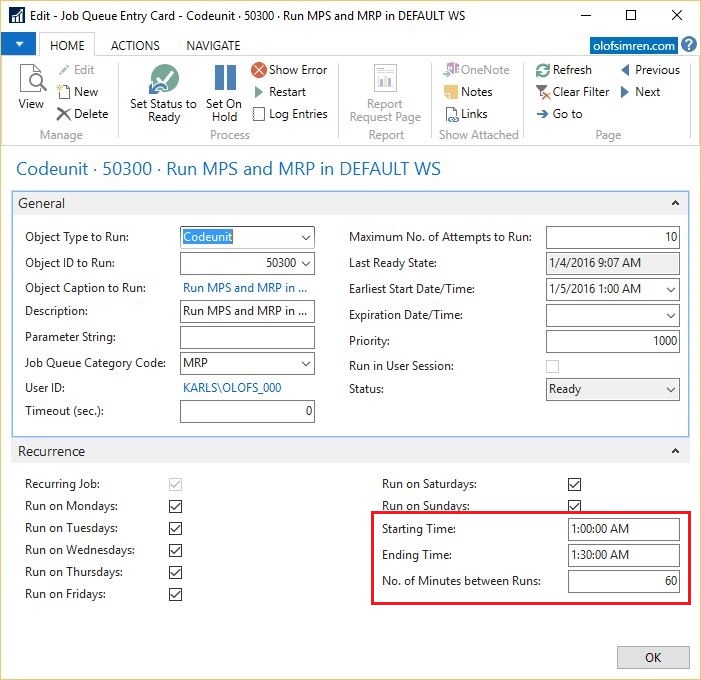
Once the job queue is running you just have to schedule the codeunit to run by creating a recurrent job queue entry. I typically do something like below where I say it should run between 1.00 am and 1.30 am with an hour between each run (so I know it does not run twice).
I recommend to set this up to run after midnight (instead of before 12 am) since the suggestions are then generated the same day as they will be reviewed by the planner(s) (otherwise the starting or ordering dates will be the day before).
A last thing to notice is that this approach also works for calculating the plan in the requisition worksheet (if you are not in a manufacturing environment). It is then report 699 instead of 99001017 that needs to be run from the codeunit.
The More Advanced way of running MRP in the Job Queue
Some things that you might have noticed is missing in the simpler solution described above is the option to populate multiple worksheets (it all went into the DEFAULT one) and to specify some of the other parameters you have when manually running the MRP calculation. If you need those options then the method described below is probably a better solution.
The overall concept of this method is similar to the first method but with the difference that a setup table has been added. The setup table allows to define multiple calculation runs with different parameters, and to what worksheet the results should be added to.
If you have multiple planners that each are responsible for planning ‘their’ items, then this is the better solution because they can then have their own worksheets where they are working.
The setup table could look like below, it has a code that identifies the configuration (to allow multiple configurations) and all the option you have as a user when running the calculate plan manually (staring/ending dates, MPS/MRP, etc..). Part of this setup is an option to specify what worksheet the suggestions should be created in and an item view. The item view sets the sorting and filters on the item table. This way you can separate the complete MRP run into different worksheets (see the Microsoft help about how to create records views).
In the below example Mike is responsible for planning the ‘furniture’ items, Sara is responsible for planning the manufactured items and Steve is responsible for planning the purchased items and they all have their own worksheets that are equal to their names that that are working in.
When you split the MRP calculation up this way you need to be aware of the fact that the different items creates demand for each other and that they have to be planned that way. You can for example not plan purchased items before you plan manufactured items if they use the purchased items as components since that plan for the manufactured items creates demand for the purchase ones. If you are aware of this, then running multiple MRP calculations for different items are possible (you just have to run the top level parts first before the lower lever parts are run). The low level codes can help you determine what to run when (see low level code blog post for explanation about the low level code).
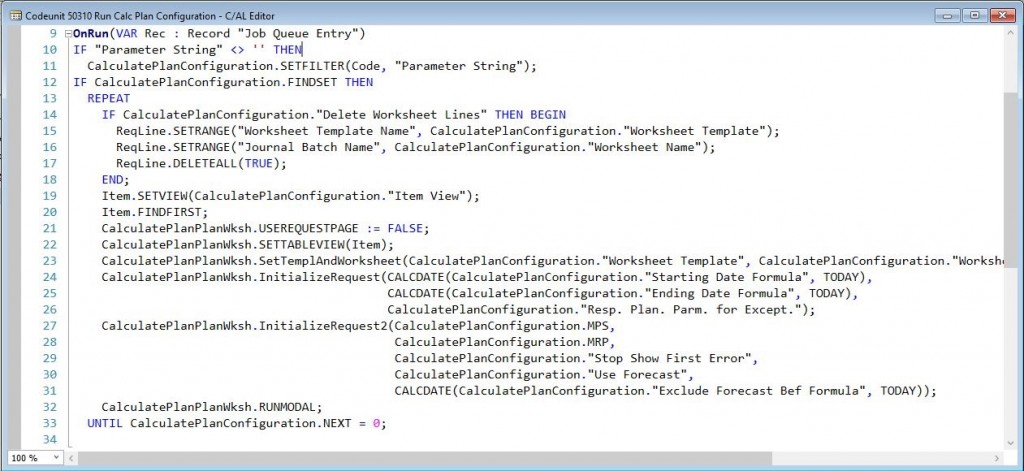
When you have created a table like the one above, writing the code is simple and similar to the first example above. Just write something like the below code similar to the first example (with the job queue entry as TableNo in a codeunit), but instead of hard coding the values we use the valued from the new table.
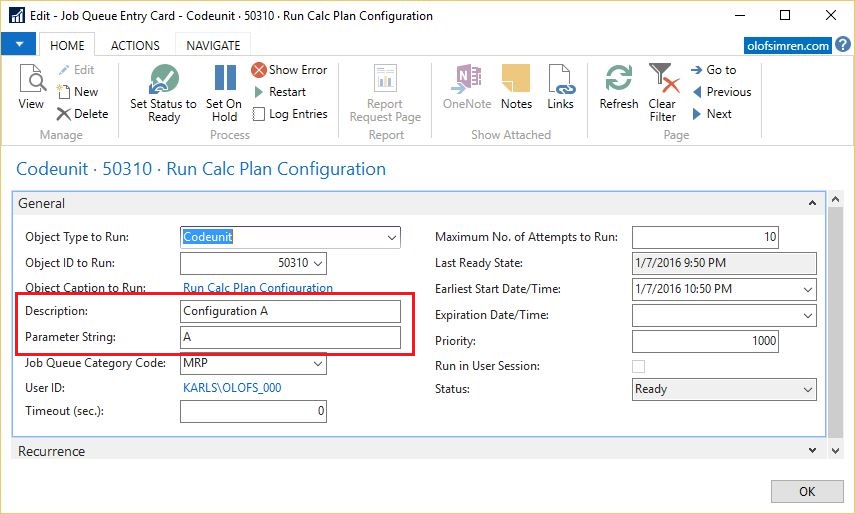
A job queue entry have a parameter string that can be defined, this is a perfect example of how that field can be used as a filter to schedule the different calculation with different job queue entries (line 10 and 11 in the code above). This allows multiple job queue entries to be setup to run the same codeunit with different parameter strings (‘A’, ‘B’, ‘C’ in this example). If you do this it is recommended that you change the description to something more meaningful than the object name, otherwise you will not be able to differentiate between the different jobs in the job queue log entry.
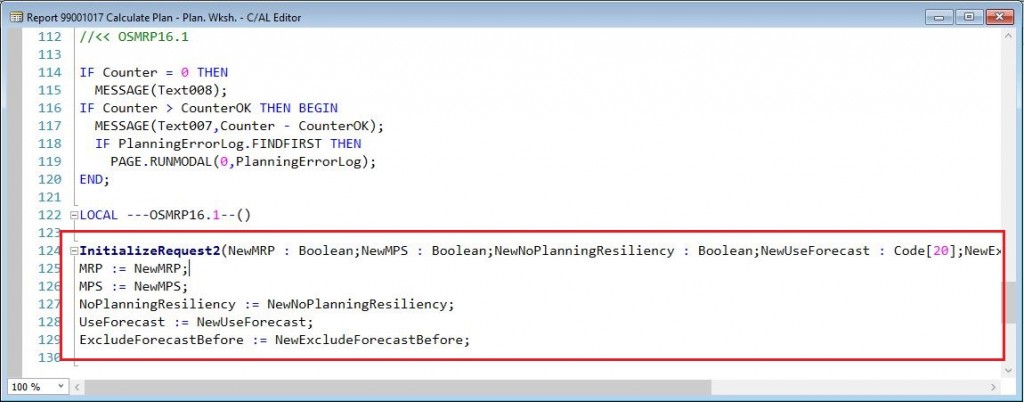
The calculate plan – plan wksh. report (report 990010170) unfortunately does not have a function to initiate all of the parameters (the MRP/MSP, planning resiliency and forecast options does not exists) so this is something that we have to add to it. We can do this by adding an InitiateRequest2 function (as an example) where we set those parameters before running the report. Such as function can be added to the report as below (this is then used in the code as displayed about on line 27 to 31 above).
This is it! 🙂 Now you can use this and schedule different MRP calculation that populates different planning worksheet through the job queue functionality. Just remember that the order in which the parts are calculates is very important, you don’t want to calculate the lower level parts before you calculate the upper lever parts.
I hope this example gave some insight in how you can have Microsoft Dynamics NAV to automatically do some replenishment scheduling for you. I have used this method in many places and it does add a lot of value to companies running their production based on an MRP plan.
You can download this example through my downloads page and use it as you wish.
I have in the past done a blog post about how to do a successful MRP implementation, you can read it here; Guide to Successful MRP Implementation.
Remember to share this blog post if you think it adds values to others.


6 Comments
Leave your reply.